
💡 Preliminary Notes: With this tutorial, you'll learn how to automatically redirect users to a specified URL when they visit your domain.
⚠️ Important Reminder: After changing a domain name's DNS servers, it takes some time for the changes to take effect (typically anywhere from several tens of minutes to 24 hours, and up to 48 hours). Please be patient after completing the configuration,Don't test repeatedly.。
📑 Table of Contents
Step 1: Add a domain to Cloudflare
- Log in to the Cloudflare dashboard and click on the left-hand menu's Domians(Domain Name) → Overview(Overview), then click Add site(Add a site).
- Enter your own domain name and click "Continue."
- Select Free(Free) Plan—after confirmation, proceed to the next step.

Step 2: Add 2 DNS records (the Orange Proxy must be enabled)
✅ Key Points: The IP address entered here is a sample virtual address,You do not need to replace this with your own server's IP address.。
Add the following two lines A Record:
| Type | Host Records | Recorded values | Agent Status |
|---|---|---|---|
| A | @ |
192.0.2.1 |
Enable Orange Cloud (Proxy) |
| A | www |
192.0.2.1 |
Enable Orange Cloud (Proxy) |
🚨 Tips for Avoiding Pitfalls: Cloud iconMust be displayed in orange(Proxy is enabled). If this option is grayed out, it means the proxy is not enabled, and the 301 redirect feature will not work properly.
Once you've finished adding the information, click "Continue to the Next Step."
Step 3: Change the DNS servers with your domain registrar
Go to the platform where you purchased your domain (such as Alibaba Cloud, Tencent Cloud, GoDaddy, etc.) and locate the domain's DNS Management Page:
- Delete the current default DNS server addresses.
- Replace them with the following two sets of addresses assigned to you by Cloudflare (these are examples; please use the addresses displayed in your Cloudflare dashboard):
isla.ns.cloudflare.comlloyd.ns.cloudflare.com
Save your changes and wait for the DNS changes to take effect worldwide.
📌 Example (Alibaba Cloud): Domains & Websites → Domain List → Click the corresponding domain → DNS Management → Change DNS Servers.
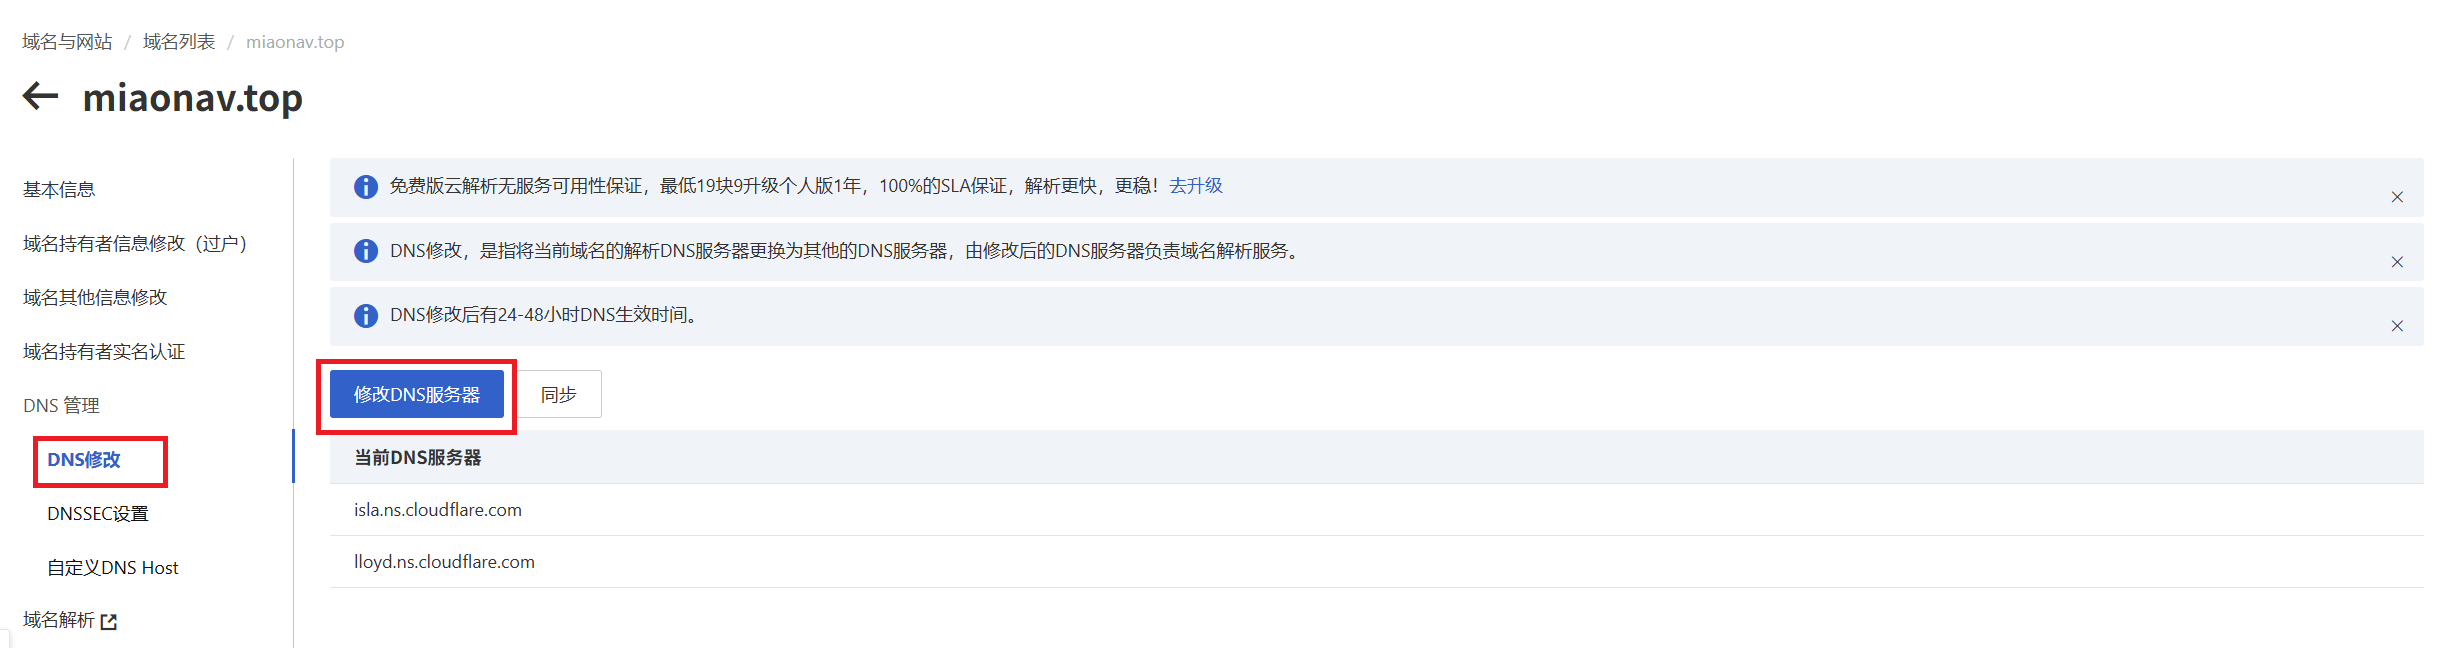
Step 4: Create a 301 Redirect Rule
- Return to the Cloudflare dashboard and click the menu Rules(Rules) → Overview(Overview) →Create rule(Create Rule) → Then click Redirect Rules(Redirect Rules)
- Give the rule any name you like (for example, “301 Redirect”).
- Match Criteria Select Custom filter expression(Custom filter expression).
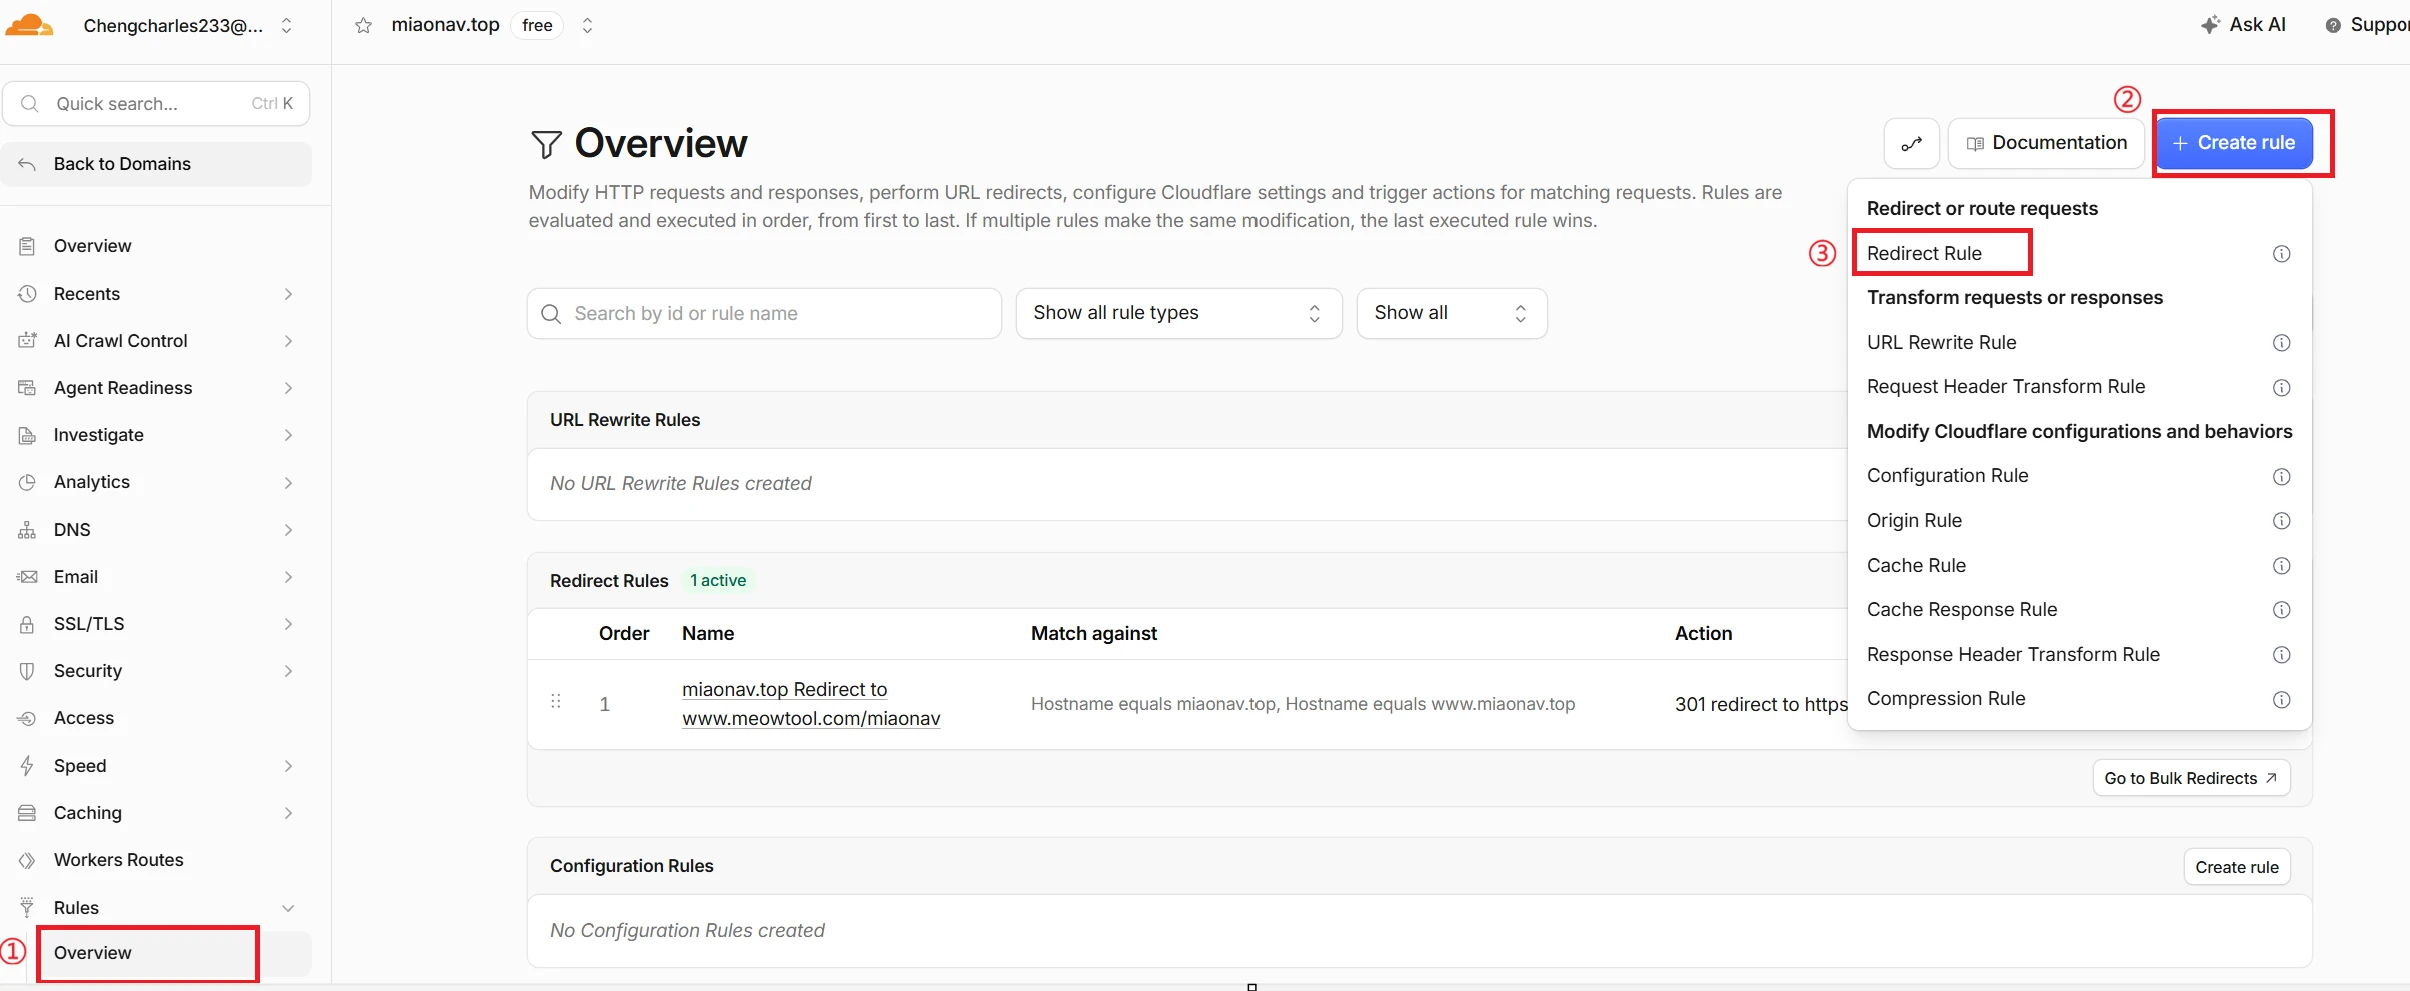
Two transition effects—please choose the one that best suits your needs.Choose one of the two, Do not set both at the same time
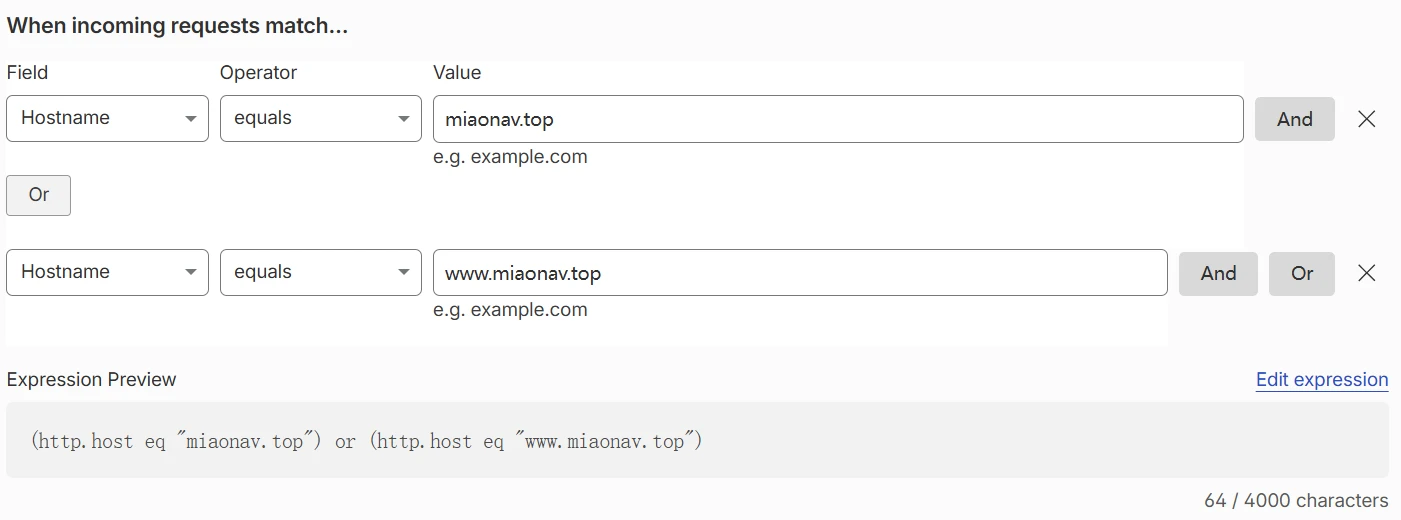 👉 Option 1: Redirect to the home page only (recommended for beginners)
Effect: Only when accessing the domain's homepage (i.e., the root path) /) the page will redirect; when accessing other subpages, the page loads normally and does not redirect.
Steps for Configuring the Graphical User Interface:
- Add Condition ①:Hostname equals
Your Domain Name(withoutwww, for exampleexample.com) - Click Or Additional Condition ②:Hostname equals
Your Domain Name(withwww, for examplewww.example.com) - Add another condition ③:URI Path equals
/
👉 Option 2: Redirect all pages
Effect: Whether you visit the homepage or any subpage, you will be automatically redirected to the target URL.
Steps for Configuring the Graphical User Interface:
- Add Condition ①:Hostname equals
Your Domain Name(withoutwww) - Click Or Additional Condition ②:Hostname equals
Your Domain Name(withwww)
💡 Note: Regular users are advised to simply check the boxes in the graphical interface shown above; advanced users can also click “Edit Expression” to write code directly.
Set Redirect Behavior (The following settings apply to both options)
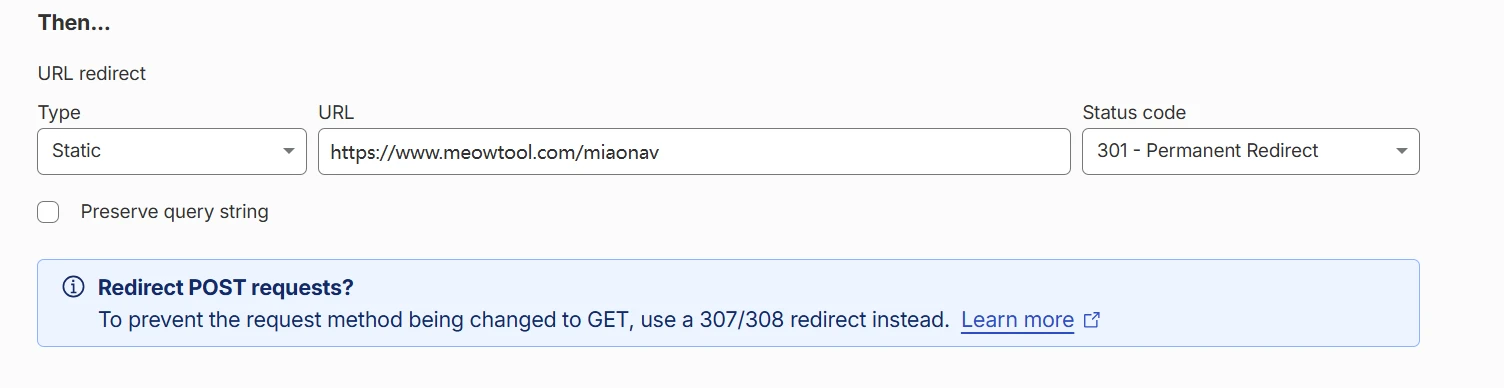
- URL Type: Select Static(Static) — ❌ Don'tSelect "Dynamic"
A simple explanation: "Static" means that all requests are redirected toThe same oneA static URL (the one you enter below); a dynamic URL means that the destination address is automatically generated based on different requests. Regular users don't need this feature—selecting "static" is sufficient. - Destination Address (URL): Enter the full URL you want to navigate to, for example
https://www.meowtool.com/miaonav - Status Code: Select 301 - Permanent Redirect(Permanent Redirect)
- Preserve query string:Close(i.e., without the original URL parameters)
- Rule Priority (Place at): First(If “First” is selected for the redirect rule, this rule will be executed first; if “Last” is selected, it will be placed at the end of all existing rules and executed last.)
Once all settings are complete, click Save(Save). Once the DNS changes take effect, you can test whether the site is accessible.