
💡 Preliminary Notes: This Cloudflare redirect tutorial walks you through every step of setting up a Cloudflare 301 redirect for your domain. Whether you're migrating a website, consolidating multiple domains, or simply want to forward traffic to a new URL, Cloudflare redirect rules provide a fast and reliable solution without requiring changes to your origin server.
⚠️ Important Reminder: After changing your domain's DNS servers, it takes some time for the changes to take effect (typically anywhere from several tens of minutes to 24 hours, and up to 48 hours). Please be patient after completing the configuration and avoid repeated testing.
Step 1: Add a domain to Cloudflare
- Log in to the Cloudflare dashboard, click "Domains" → "Overview" in the left-hand menu, and then click "Add domain."
- Enter your own domain name and click "Continue."
- Select the "Free" plan, confirm your selection, and proceed to the next step.

Step 2: Add 2 DNS records (the Orange Proxy must be enabled)
✅ Key Points: The IP address listed here is a sample virtual address; you do not need to replace it with your own server's IP address.
Add the following two lines A Record:
| Type | Host record | IPv4 address | Proxy status |
|---|---|---|---|
| A | @ |
192.0.2.1 |
Enable Orange Cloud (Proxy) |
| A | www |
192.0.2.1 |
Enable Orange Cloud (Proxy) |
🚨 Tips for Avoiding PitfallsThe cloud icon must be orange, which indicates that the Cloudflare proxy is enabled. If it appears gray, the proxy is disabled, and the Cloudflare 301 redirect will not work properly.
Once you've finished adding the records, click "Continue to the Next Step."
Step 3: Change the DNS servers with your domain registrar
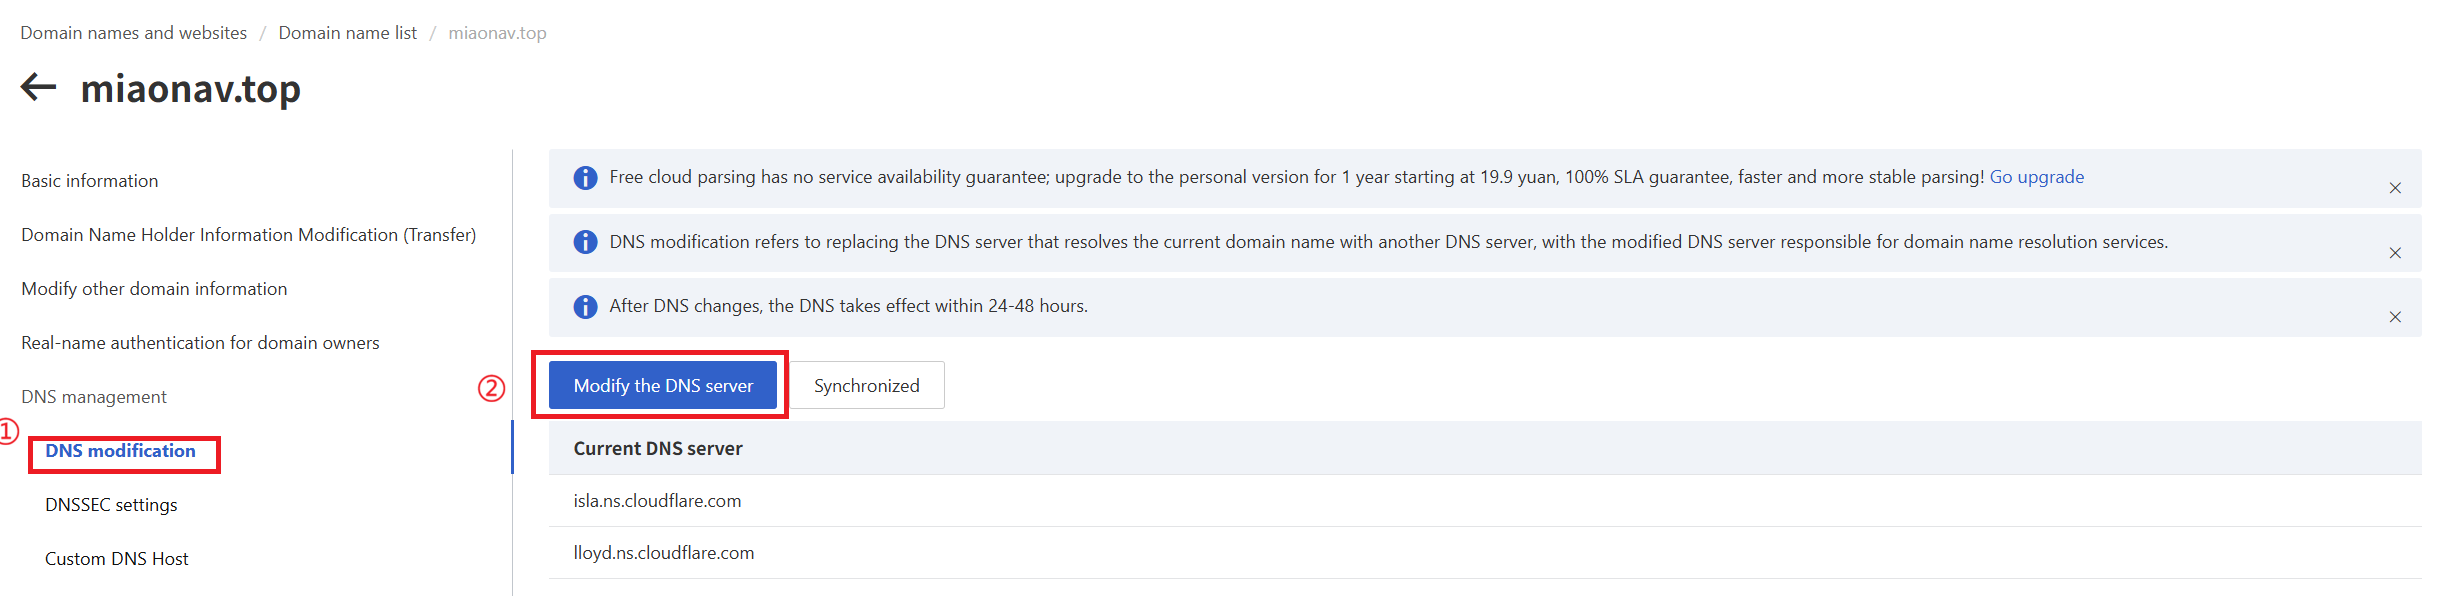
Go to the platform where you purchased your domain, such as Alibaba Cloud, Tencent Cloud, or GoDaddy, and locate the DNS management page for that domain:
- Delete the current default DNS server addresses.
- Replace them with the two nameservers assigned to you by Cloudflare. The following are examples; please use the nameservers displayed in your own Cloudflare dashboard:
isla.ns.cloudflare.comlloyd.ns.cloudflare.com
Save your changes and wait for the DNS changes to take effect worldwide.
📌 Example (Alibaba Cloud): Domains names and websites → Domain name list → Click the corresponding domain → DNS Management → DNS modification → Modify the DNS server.
Step 4: Create a 301 Redirect Rule
- Return to the Cloudflare dashboard, click "Rules" → "Overview" → "Create rule", and then select "Redirect Rules."
- Give the rule any name you like, such as "301 Redirect."
- Under Match Criteria, select "Custom filter expression."
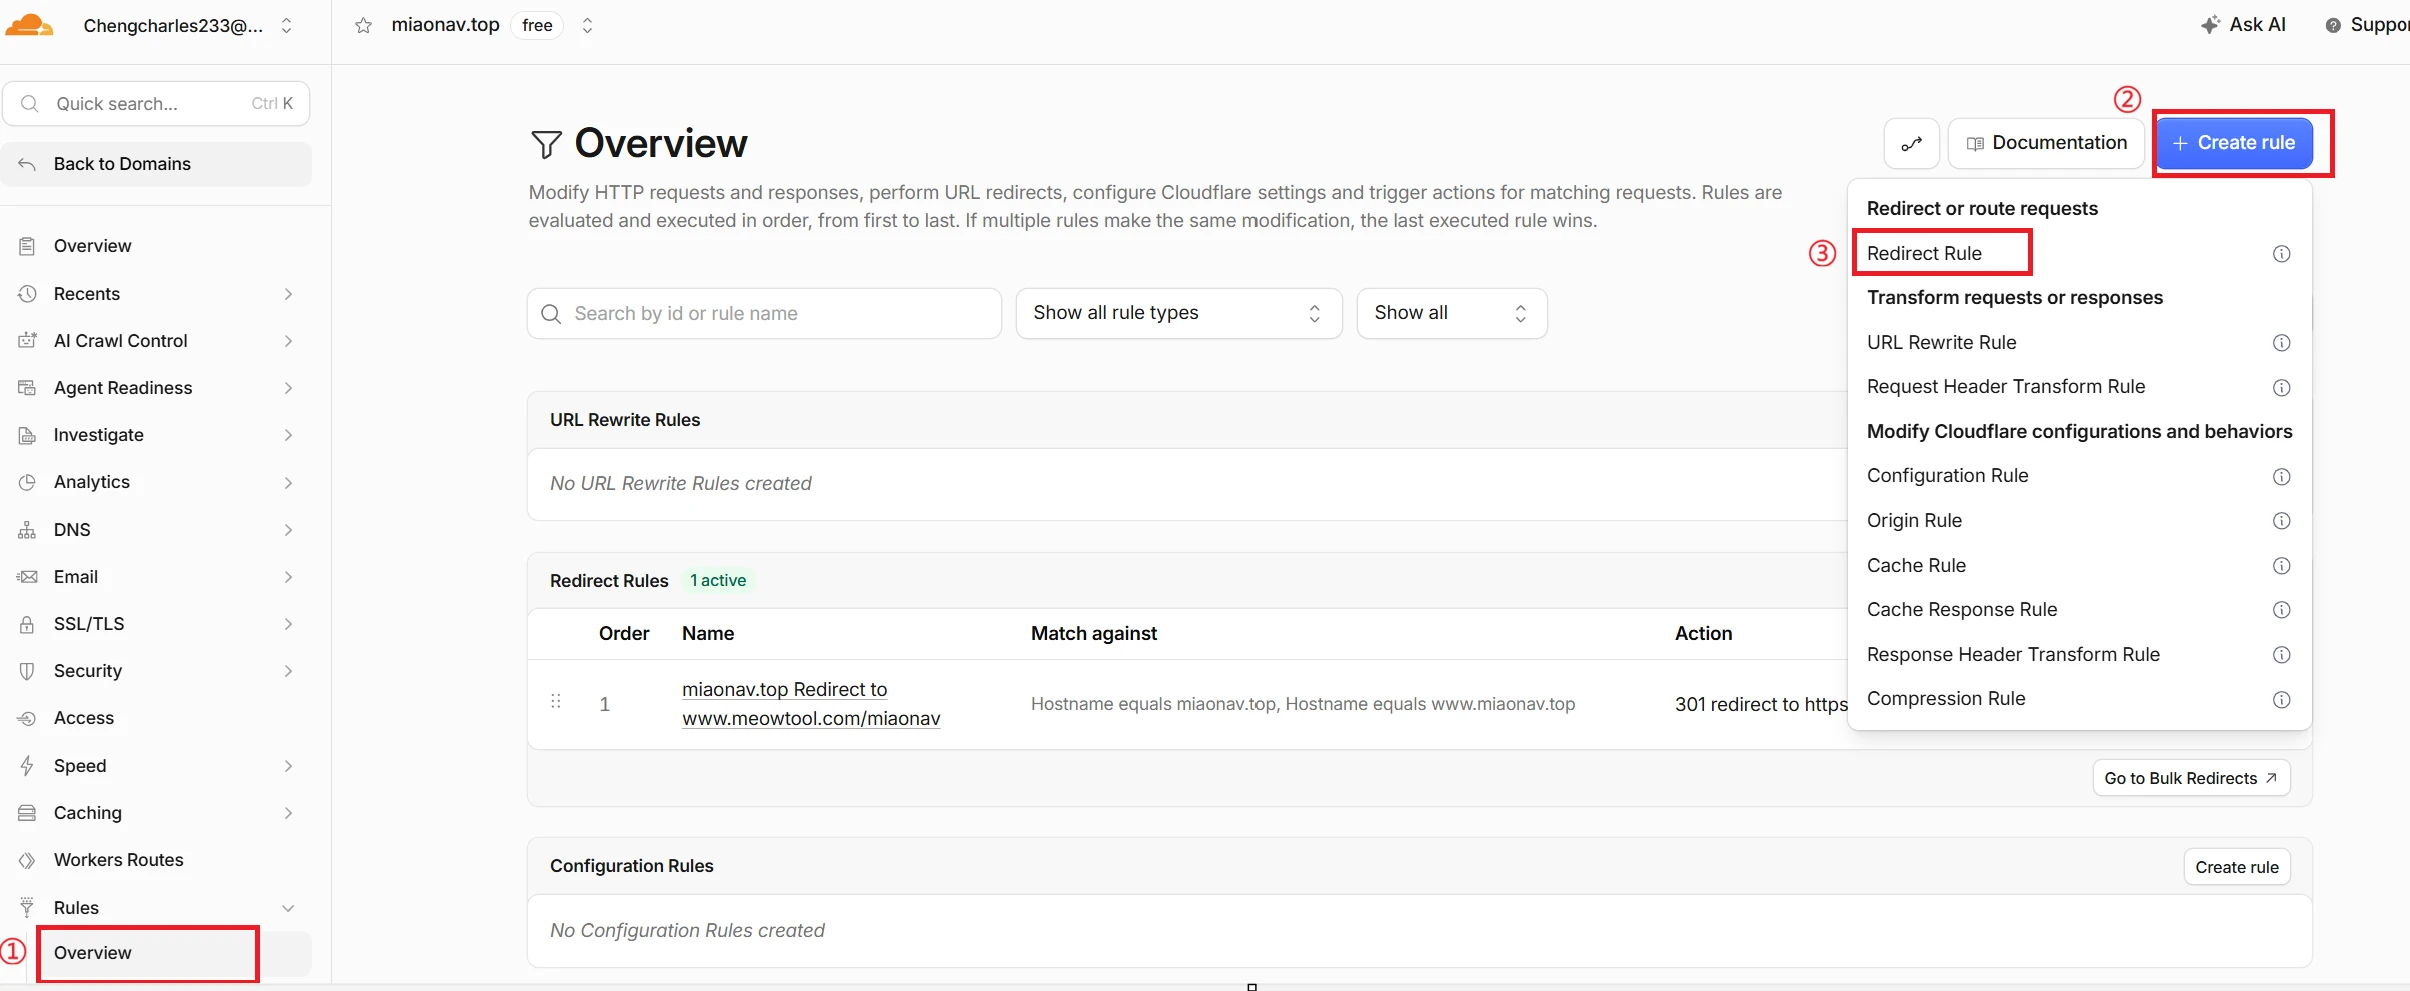
There are two redirect options; please choose one based on your needs—do not set both at the same time.
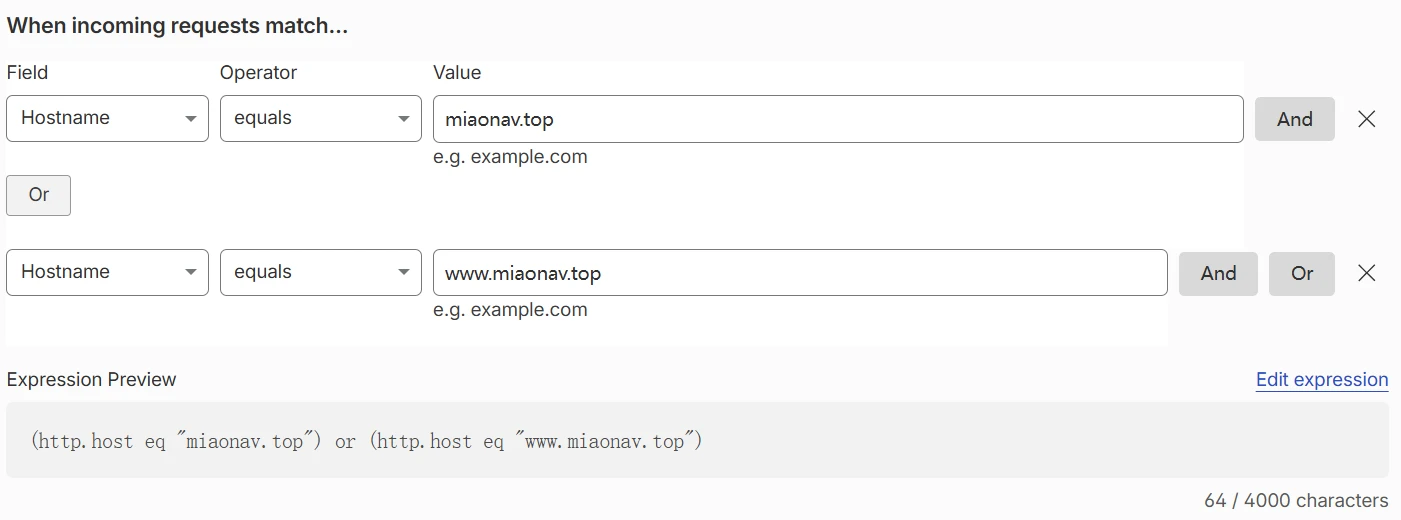 👉 Option 1: Redirect to the home page only (recommended for beginners)
Effect: Only when accessing the domain's homepage (i.e., the root path) /) the page will redirect; when accessing other subpages, the page loads normally and does not redirect.
Steps for Configuring the Graphical User Interface:
- Add Condition ①: Hostname equals
Your Domain Name(withoutwww, for exampleexample.com) - Click "Or" to add condition ②: Hostname equals
Your Domain Name(withwww, for examplewww.example.com) - Add another condition ③: URI path equals
/
👉 Option 2: Redirect all pages
Effect: Whether you visit the homepage or any subpage, you will be automatically redirected to the target URL.
Steps for Configuring the Graphical User Interface:
- Add Condition ①:Hostname equals
Your Domain Name(withoutwww) - Click Or Additional Condition ②:Hostname equals
Your Domain Name(withwww)
💡 Note: Regular users are advised to simply check the boxes in the graphical interface shown above; advanced users can also click “Edit Expression” to write code directly.
Set Redirect Behavior (The following settings apply to both options)
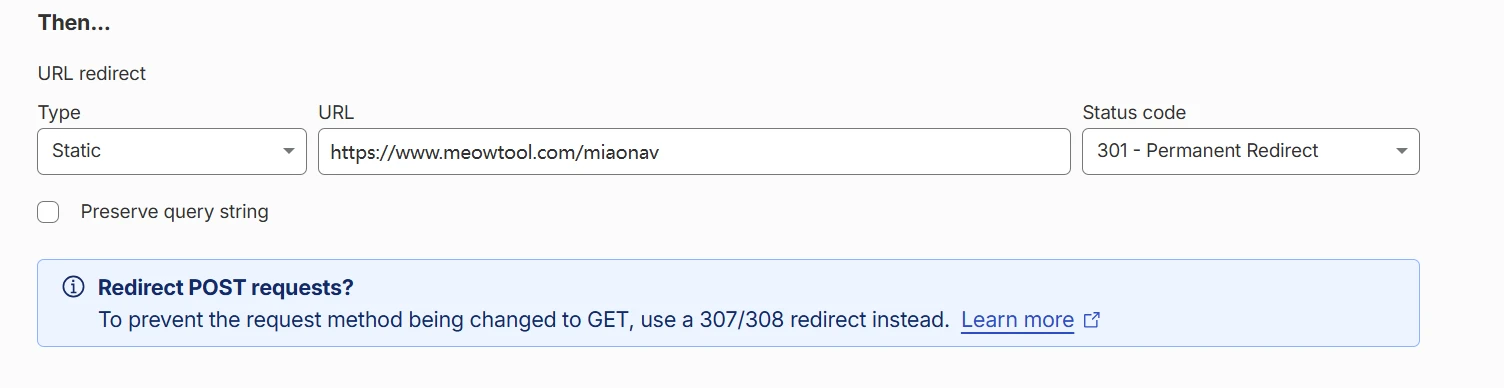
- URL Type: Select "Static" — ❌ Do not select "Dynamic"
In simple terms,Static means that all matching requests are redirected to the same fixed URL you enter below. Dynamic generates the destination URL based on different requests. For a basic URL redirect with Cloudflare, selecting Static is sufficient. - Destination Address (URL): Enter the full URL you want to navigate to, for example
https://www.meowtool.com/miaonav - Status Code: Select 301 - Permanent Redirect
- Preserve query string: Disabled (i.e., does not carry the original URL parameters)
- Rule Priority (Place at):Select First if you want this Cloudflare redirect rule to run before other existing rules. Select Last if you want it to run after all existing rules.
Once all settings are complete, click "Save." Wait for the DNS changes to take effect, then test the redirect. This completes the basic Cloudflare domain redirect configuration.
Frequently Asked Questions (FAQ)
I followed the tutorial, but when I visit the domain, it doesn't redirect. What could be the reason?
The most likely reason is that the DNS changes have not yet propagated globally (which can take up to 48 hours). Please first verify the following: whether the DNS settings at your domain registrar have been successfully updated to the two sets of IP addresses assigned by Cloudflare; whether the domain status in the Cloudflare dashboard is “Active”; and whether the cloud icons for both A records are orange. If all of the above have been confirmed, we recommend waiting 1–2 hours before testing again; avoid making frequent changes.
Do I need to replace 192.0.2.1 in the two A records with my own server's IP address?
No, you don't need to. This IP is only an example virtual address. Once you enable the Orange Proxy, Cloudflare will take over the traffic, and the actual origin IP will be determined by Cloudflare. Please leave it as is.
Can Option 1 (redirect to the home page only) and Option 2 (redirect all) be enabled at the same time?
No. The two options are mutually exclusive; setting both at the same time will result in rule conflicts or abnormal redirection behavior. Please select only one configuration based on your actual needs.
How long does it take for redirect rules to take effect after they are saved?
Rules take effect immediately on the Cloudflare side, but the final access experience depends on the progress of DNS resolution. Once DNS propagation is complete (typically within a few tens of minutes to 24 hours), the redirect will work immediately. Please do not repeatedly enable or disable rules or modify DNS settings before the changes take effect.
I want to temporarily disable the redirect. How do I do that?
Go back to the Cloudflare dashboard, navigate to Rules → Overview, locate the redirect rule you created, and set the toggle to "Disable," or delete the rule directly. Once disabled, the original domain will resume normal access (without any redirects).
If I purchased the domain name through Cloudflare, do I still need to change the DNS servers?
No, you don't need to. For domains registered with Cloudflare, DNS is managed by Cloudflare by default. You can skip Step 3 of the tutorial and start configuring redirect rules in Step 4.